
1 year ago
Nissan e-Power explained
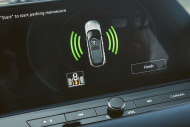
A reversing camera is an incredible piece of technology - so much so that once you’ve owned a car with a camera, you might struggle to park one that doesn’t offer the tech
A reversing camera is an incredible piece of technology - so much so that once you’ve owned a car with a camera, you might struggle to park one that doesn’t offer the tech. And with new systems incorporating more cameras for more views - including kerbside, side, front and top-down/surround view - the information on your car’s media display can feel like it’s a bit much at times.
As such, you might have wondered - what are those lines on the display supposed to be used for? In general terms, the lines on the camera display are there to help you figure out how much space you have available to you while parking.
Reversing camera systems with guidance lines should help you better understand the distance between the back of your vehicle and any obstacles within the surroundings.
There are different types of lines on the camera:
There are pros and cons for both types.

Static lines will always be the same, so it will be easier to learn the actual limitations and space behind your vehicle. The guidelines are easier to interpret - they never change, and in most instances you will remember the vehicle’s parameters better. But static lines don’t actually help you visualise the move you’re making while reversing (or driving forward, if your car has a front camera as well).
Dynamic lines are pretty helpful if you’re the sort of person who learns by seeing. They offer you a view of what the car will do if you maintain the steering lock. Turn the wheel, and you will see the lines magically move in counter to your adjustments - that’s supposed to help you see what path the car will move in, if you steer the car in that direction to that extent.
Dynamic lines are handy for figuring out your vehicle’s spatial parameters, but they can prove confusing if you’ve not used a car with that setup before. They also can lead you into a false sense of confidence - it’s always best to use your mirrors and the camera system to help you find the right line when parking.
Many manufacturers fit their camera displays with colour-coded lines to help you figure out, at a glance, what should happen next. Note - these guidelines are best considered accurate on flat, level ground surfaces, as gradient changes can affect the accuracy of the lines on the screen.

Green means you’re all clear, there’s plenty of space behind. Amber or yellow means you should exercise caution as you could be getting close. If you’re in the red zone, do what you would if you saw a red traffic light - stop!
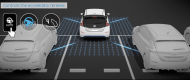
If you have a car with a surround-view camera and front- or side-parking sensors, you may also note the same colour-coding system is present.
As for what the lines themselves are supposed to indicate to you? It’s simple!
Your car’s width is at the outer edges of the illustrated lines. You need to be conscious of the width, as you can easily think you will fit into a space if the camera shows a clear zone, but those lines help you figure out if you will actually fit in.
Then there are the coloured zones, as mentioned, are indicated in colours to help you discern whether you can keep going, slow down and prepare to stop, or halt the car completely to make sure you don’t hit anything.
And some camera systems also have a “danger” zone, which is in red. Typically this is set for about 45 centimetres (18 inches) proximity to the vehicle.
Some vehicles - namely Toyota models - have blue lines for all indicative purposes, except a red horizontal line that is set to about that “danger zone” level of distance (on flat, level ground). Toyota models also have a solid horizontal blue line that indicates roughly a metre of distance.
Beyond that, there are other functions that some camera systems offer. Some manufacturers offer three different reverse-camera view options - Wide View, Normal View and Top Down View, the latter of which is great when you want a better look at just how far you have remaining behind the vehicle.
And then there are other new camera systems that offer an augmented reality view of the car from different angles. If the dynamic guidelines confuse you, this will take a lot of learning.
This isn’t to be considered a lesson in “how to reverse”. Disclaimers like the one on Toyota’s global site offer a great reminder: “The backup camera does not provide a comprehensive view of the rear area of the vehicle. You should also look around outside your vehicle and use your mirrors to confirm rearward clearance. Cold weather will limit effectiveness and view may become cloudy.”
Further, reversing cameras and surround-view cameras are terrific parking aids and awesome safety inclusions, but please do a physical check around the car before you drive.
